


Step one: Have a sweet and crafty blogger ask you if you would be so kind as to contribute a guest blog post while she tends to her delicious newborn bundle of joy. (Thank you Lauren, I am so very flattered!) Eagerly agree and then slap yourself on the forehead and wonder what in the world was I thinking???
Step two: Find a neighbor who has kindly paid for someone else to cut down a tree. Smile pretty and ask (beg) for a stump. Watch husband begrudgingly drag stump down the street and plop it unceremoniously on the driveway. Think, think, think. Decide to paint the stump and use it as a little side table on the screened porch. (Keep fingers crossed that it is not termite-ridden)
 Step three: Attempt to convince dear husband that the best use of his time on the first sunny Saturday spring
morning is to scrape bark off the bug-riddled stump. (While you photograph the bark removal and the neighbors across the street shake their heads in pity at the crazy lady taking pictures of a tree stump on her driveway)
 Step four: Sand the stump until smooth.
Step five: Brush on an oil-based outdoor varnish- clear, satin finish. (To add a protective finish and seal the wood, but really to make sure that any little remaining critters will not escape)

Step six: Choose a cheery paint color. (And use this visit to the hardware store as an excuse to swipe all the
gorgeous paint swatches from the new Martha Stewart line at The Home Depot)
FYI-I used a paint/primer all-in-one combo and applied three coats.

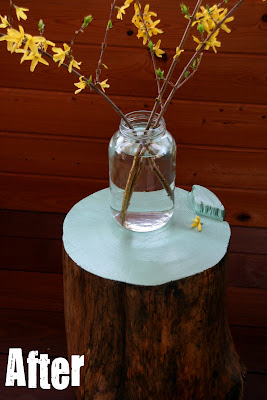
Step seven: Ask (beg) dear husband (who is now cursing the day he ever agreed to such nonsense) to lug finished stump to the porch. Decorate!


Step eight: Put your feet up, grab an adult beverage, and savor the fruits of your (and the mister's) labor!

For full details on a similar step by step project, check out Martha's DIY here. The above
image is via Martha Stewart. For all my exaggeration, this really was a simple, only slightly time intensive
project. The cost was minor as the stump was free and I only had to purchase varnish and paint. I am very happy with the results and am already on the search for another discarded tree stump to pretty up. Thank you so much Lauren for inviting me to participate in a before and after. I'm so honored. I always find so much inspiration here at Pure Style Home and am always bowled over by your energy, enthusiasm, and beautiful vision. Thank you for inviting me!
{The particulars: (1)Behr Spar Varnish,
Classic Oil, Clear Satin, (2)Martha Stewart Living Paint, Duck's Egg,
MSL133, Semi-Gloss, (3)Dash and
Albert Rug, (4)Chair and Ottoman from the now defunct Smith &
Hawken)

-----------------------------------------------------------------------
Ok, so I want one!! LOVE this. Nelya - you're amazing and this looks like a magazine spread!!
xoxo,
lauren
Classic Oil, Clear Satin, (2)Martha Stewart Living Paint, Duck's Egg,
MSL133, Semi-Gloss, (3)Dash and
Albert Rug, (4)Chair and Ottoman from the now defunct Smith &
Hawken)
-----------------------------------------------------------------------
Ok, so I want one!! LOVE this. Nelya - you're amazing and this looks like a magazine spread!!
xoxo,
lauren
 As a decorator & a textile designer, this is my place to muse... perfection doesn't interest me; Reality and charm do. Fresh floppy flowers from the garden over long-stemmed roses any day, I love it when things are slightly off and tell a story.
45 comments:
ok, next time i am "stumped" i will simply defer to your trunk of fabulously witty and woody ideas.
fantastic.
you humor is so sweet,
be my guest any ole time. lots of trees by me.
pve
the result is amazing and I really enjoyed reading the how to, so sweet! what a nice husband!
Great idea! We have a very large cherry tree on the ground right now that was cut down last fall. My poor husband is going to be so happy when he hears what he will be doing this weekend!
I love this idea so much. The color used on top is perfection...and your husband rocks!
A friend of mine did this and it turned out great...yours too. That little sitting area is perfection!
An editor's eye for luscious interiors and the ability to throw down with the crafts?
Nelya, you are amazing!
that Nelya is fantastic, no...?
I think this was one of your best guest bloggers to date! I love Neyla and her blog. This was an amazing transformation of that bug ridden stump. Next time I see a tree stump I won't be able to pass it by!
Hope you are well!
~jamilyn
Ahhh. And it lokks like it always belonged there. Right there.
Perfect!
That is the perfect outdoor side table! We may be fixing to cut down a few trees, I'll have to remember this idea!
☺ Celeste
How creative and clever. I love it!
I did this project last fall and got stumps for my patio, but forgot that oh-so-important step of varnishing. Is it too late or can I still clean it up, varnish it and still have it useful while trapping in the little critters that now call the stumps home?
that room looks so great! you guys did a great job. thanks to you and Martha for the idea and steps on how to do it.
Oh my! I was totally planning on doing this w/ a stump from a tree we are having taken down this summer. I am already preparing myself for my husband responding, "You want to do what?!?!?"
Sharon
love it! Nelya, you have a great eye!
Great job! And kudos to your husband for heavy duty help!
Hello everyone! Lauren, thank you for inviting me to participate in this great series and for giving me the push I needed to finish my project! You are a daily source of inspiration and fabulous ideas!!!
Thanks everyone for your kind words and enthusiasm! I'm so happy you all enjoyed my before and after.
Brandie: I would definitely try giving your stump a revamp. Just let it dry out in the sun for a few days. Then give it a good sanding and 2-3 coats of varnish. Good luck!
I LOVE this! There are some big stumps sitting out in front of a house in my neighborhood and I've been dying to grab one, hoping they're trying to get rid of them. After seeing this I might work up the nerve to actually knock on their door and ask.
What a great DIY project- I love the color you picked too! I'll have to save this project in my idea book for a future project :)
Nelya,
I have been driving past the spoils of cut down tree that was damaged in a recent storm in Dallas. Time to get out of my car and be a scavenger. I have the perfect place for a stump (I mean a side table) out side under a porch overlooking the pool. Thanks for the inspiration... just how heavy are those things anyway?
xxmb from Dallas
So awesome! My husband is always wanting to bring home tree stumps that we find in our neighborhood. I think the next time he does, I will let him!
Nelya, I didn't know you were craftulent!! I love it. And adore the Duck Egg top! I want a stump!
I love this! I'm searching for a neighbor now! haha
Funny and clever - Nelya is adorable! And this tree stump is so crafty. I have so much respect for the fact that she actually did this herself rather than paying for a "salvaged antique" type stump from the likes of Restoration Hardware, et al! Love it! Marija
I have always loved this look. West Elm has a table like this for $199. For the do it yourselfers this is a much better way to go. I live in Arizona surrounded by palm trees so I probably couldn't find a tree to suit this project. Thanks for sharing and keep these wonderful ideas coming!
I'd like one...Please! Janell
LOVE this post!
I am going to be doing this!!! For sure!
Thank you for you kind email! You are really sweet! I am so glad Ness told me about YOU!
Have a wonderful day!
Take Care,
Maria
I am off to check out this talented girl!
what a great gorgeous idea!
happy day!
Rosa
So smart and the perfect look for your space!
I stupidly let a friend talk me into helping her bring a stump out of their woods years ago for her little boys room and learned the hard way...just cause you can see the bugs doen't mean they aren't there. We had to call her husband home to get the infested thing out!
stumps are awesome....now.
Absolutely LOVE it and what a fun post to read Nelya:) Wishing you and Lauren a wonderful week ~ Tina xx
This is simply great! I have one tree stump and I want another and this inspires me!
Love it. Now I am on the look out for a pair for my screened porch.
How pretty and unique! I love it! What a great statement and accent!
:)
Roeshel
Love,love this, so much cleverness in one lady!!WOW Kathysue
Hi! just found you via Colour Me Happy. Love your blog.
Ps. I just returned from walking out to get the mail and couldn't resist snipping some forsythia after seeing Nelya's photos! ;) Thanks for sharing!
What a lovely idea..great post.
100% amazing! I want one too
amazing nelya!! way to go!
Nelya, as always you bring the bestest!
love it!
I am seeing this everywhere! As a painter who paints everything....I have NOT painted a tree stump before! haha! They are cute. STop by my painting blog sometime and say hello! Jennifer
I have a huge stump on my front porch. I think its time to spruce it up it by.
I laughed the whole time I read this post...you sounded exactly like me (crazy projects....asking husband to help me) and your husband sounded exactly like mine! (Doing as asked cuz he loves me dearly...but would really rather be doing something else) I actually saw a tree stump the other day on a walk and he just gave me one of his stares because he just knew what was coming....glad to know I'm not the only one!
Post a Comment